Monday, November 20, 2017

Thanksgiving - with and Israeli Twist

Thanksgiving is an all-American holiday.  But the theme of the year at Beth El is Israel.  Is there a way to incorporate the two?  YES - thanks to Jill Rider our Vice President of Community Engagement.  


On a recent trip to Israel, Jill visited a winery in Northern Israel and came back with this terrific recipe for sweet potatoes (a Thanksgiving staple) with an Israeli twist - the addition of tahini.  The recipe is simple, with a balance of sweet and spice.  This recipe could easily stand on it's own, but should also make a nice side dish next to a roast turkey!  The recipe is especially great for the holiday because it can be served at room temperature so you don't have to worry about taking everything out of the oven at the same time.


Sweet Potatoes - Roasted with Tahini
Ingredients:
5 large sweet potatoes (cut into wedges)
1-2 tablespoons olive oil
1-2 tablespoons brown sugar (or coconut sugar)
1/2 teaspoon cayenne pepper, to taste
Salt and Pepper to taste
2 cups high quality tahini


Directions:
Preheat oven to 425 degrees.  Toss sweet potatoes with olive oil, sugar, cayenne, salt and pepper.  Spread in a single layer on a cookie sheet lined with parchment paper.  Roast for 15-20 minutes (or until one side is browned) and flip.  Continue to roast until the second side has browned.  Allow potatoes to cool.  To serve, pour 1-1 1/2 cups of tahini on the bottom of the serving platter.  Spread the potatoes on top and drizzle with additional tahini. 

This recipe and many others suitable for your Thanksgiving table can be found in the new Sisterhood/Zhava Community Cookbook,  EAT IN GOOD HEALTH.  The book can be purchased on the Beth El Website Sisterhood page  https://www.bethelmc.org/groups/sisterhood/cookbook/, in the Beth El Office or Judaica Shop.  It makes a great hostess gift for Thanksgiving.

In addition this recipe and a number of others will be demonstrated at a Hanukkah event co-sponsored by the Am Yisroel Chai Committee as well as Sisterhood and Zhava on Sunday, December 17th 11 a.m.  


And don't miss the special Sisterhood/Zhava Cookbook kickoff event on December 3rd, "What the Rabbis and Chazzan Eat"


Monday, September 18, 2017

New Year, New Blog Post, New Apple Challah

I have not updated this blog in quite some time.  I can only blame my..... my picky eating child who has transformed me from someone who enjoyed coming up with new recipes and meals, to an expert at heating hotdogs. 


Thankfully Beth El's Sisterhood/Zhava is coming out with a new cookbook, Eat in Good Health, later this Fall.   It will have more than 400 new recipes!  They gave me a preview of it and I will be trying out some recipes and give you all a sneak peak of the cookbook. 


Rosh Hashanah, the Jewish New Year, begins Wednesday night.  To get you started right, here is a delicious, creative, and surprisingly easy Apple Challah recipe.  This recipe was submitted by Marilyn Fine, one of our amazing Religious School teachers.   This challah has apple chips, apple butter and honey - It is Rosh Hashanah after all!!  It also uses a combination of whole wheat and white flour.  It is a surprisingly easy dough to work with - so even a novice baker will have success with it. 


Marilyn's inspiration for this recipe was found in an Israeli cookbook. The original recipe used date honey (Silan) to sweeten the dough.  Although Silan is common in Israel (and is mentioned in the Torah), it is only just now becoming available at specialty stores in the United States.  So Marilyn innovated. She thought about what how date syrup would look like and taste, and decided that apple butter would be a close substitute. She substituted the apple butter and regular honey and used freeze dried apple chips instead of traditional raisins.  These substitutions make a perfect Rosh Hashanah themed Challah! 

Ingredients:
2 packages dry yeast
1 tablespoon sugar
½ cup warm water
4½ cups whole wheat flour
2½ cups white flour
1½ tablespoons salt
1 beaten egg
1½ cups warm water
¼ cup honey
½ cup apple butter
½ cup oil
½ cup diced dried apple chips
1 beaten egg for egg wash, plus sesame seeds (optional)


Directions:
In a small bowl, proof the yeast by dissolving it and the sugar in the ½ cup of warm water and letting it sit for a few minutes until the solution becomes frothy.
In a medium bowl, combine the whole wheat flour, the white flour, and the salt.
In a large bowl, blend the egg, apple butter, honey, 1½ cups of warm water, and oil.
Add the proofed yeast solution to the large bowl of wet ingredients and stir. 
Slowly add the flour/ salt mixture a half-cup at a time, mixing to incorporate. 
Then fold in the halfcup of dried apple chips. Knead for approximately 15 minutes, until a smooth ball of dough is formed. (Add a little more white flour if needed.)
Cover the bowl with a towel or plastic wrap and let rise in a warm place for about 1-½ hours, or until the dough doubles in size.
After it has risen, place the dough on a floured surface and divide into 4 parts. Roll and stretch each part into a long, round “snake.” Then, roll the dough into a spiral, starting from the inside out. Tuck the outside end under the rest of the loaf so that the center of the spiral is elevated. Repeat with each of the other portions of dough.
Let the loaves rise for another hour.
Meanwhile, preheat the oven to 350°F. Brush the four loaves with the beaten egg and sprinkle with the sesame seeds.
Bake on ungreased baking sheet for about 45 minutes or until browned. Remove from the oven and cool on a wire rack. Makes 4 medium-sized round loaves.

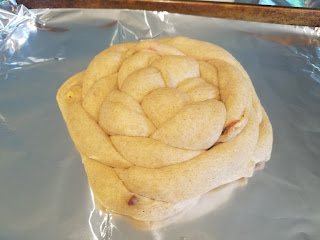
As noted, Marilyn gives a direction for a simple round spiral.  But if you want to try something different, you can search for videos on how to do round braids.  Here are the challahs I made just before and after baking.


Tuesday, September 1, 2015

Back to School --> Sandwich edition

This week brought the unofficial end of summer with the start of school for many children.  That means it is also the start of lunch box packing.  My childhood lunches were always the same.  My mom packed me a peanut butter and honey sandwich, a milk box and a pear.  Delicious.  Surprisingly, I never bored of it.  But now that I am older, and still packing my lunches, I want a more sophisticated sandwich.  Here are a few that are sure to please the grownups, and even some of the kids. 

Fig and Goat Cheese Wrap
This is a delicious and light sandwich.  Figs are still in season and readily available in many supermarkets for a few more weeks, so try this one soon!


Ingredients:
Whole wheat wrap
2 oz Herbed goat cheese
2 Fresh figs, quartered
Small handful of baby spinach


Brie and Pear on Raisin Bread
If you are looking for a heartier cheese and fruit sandwich, this is the winner.  It is more filling but still feels fresh.  It is also a good sandwich as we transition into fall.  I could be easily tempted to grill this sandwich for a new experience as it gets colder.


Ingredients:
2 Slices of raisin bread (or raisin walnut bread)
2 oz brie cheese, sliced
1/2 pear, thinly sliced
Small handful arugula
Dijon mustard
Honey

Asian Peanut Tofu Wrap
Unfortunately, I don't have a good photo of this sandwich, so you will have to take my word for it.  It's delicious and a real change from traditional sandwiches.  It is still a light and fresh sandwich, but with loads of veggies and protein. This sandwich, however, does require some advanced planning to make the tofu.  I find that one package of tofu makes enough for 4 or 5 sandwiches depending on how thick you cut the tofu.

Ingredients:
1 Whole wheat wrap
Thin slices of baked, extra firm, tofu (see directions)
Thin slices of orange bell pepper
Thin slices of cucumber
Cilantro, chopped
Asian peanut sauce (can be purchased at a store)

Directions:
Drain package of extra firm tofu.  Place on plate with some paper towels on top and bottom of the tofu.  Place another plate on top of the tofu and weigh it down with a can or something heavy.  Let sit for about 20 minutes to remove excess moisture. Meanwhile, preheat oven to 350 degrees.  Slice tofu in half, lengthways,  and then in thin horizontal slices (about 16 - 20 slices total).  Place on large baking sheet, sprayed with cooking spray.  Place tofu on sheet, season with salt and pepper and spray with more cooking spray.  Bake for about 20 minutes.   Take cooked tofu, and toss into peanut sauce.  Can stay in an airtight container in the refrigerator for about 3 days to use for  multiple sandwiches. 


Tuesday, July 28, 2015

Moroccan Meat Borekas

During the 9 days before Tisha B'Av (the date that both Holy Temples were destroyed and a fast day) it is custom to avoid eating meat since it is a period of mourning.  Now that the holiday just passed, I am really craving meat.  But since it is the middle of the summer, I don't want to cook anything too heavy, but I want something more unique then a hamburger. 

I just returned from a trip to Israel where borekas in different shapes, sizes, and fillings are all over the narrow alleys of the Shuks.  Borekas are a puff pastry dough (sometimes phyllo) filled pastry, similar to an empanada or perogie. They can be sweet or savory with fillings such as cheese, chocolate, spinach, or meat.  I decided to make my own meat filled boreka using the spiced influence of the Mid-East. 

Moroccan Meat Borekas
Ingredients:
1 box (2 sheets) puffed pastry dough, defrosted and unrolled
1 lb ground meat
1 onion, diced
2 cloves of garlic, diced
1 Tbsp tomato paste
1 tsp cumin
1 tsp paprika
1/2 tsp cinnamon
Olive oil
Salt and pepper to taste
1 egg, beaten
Sesame seeds, optional for topping

Directions:
In a large pan, cook onion in a little olive oil until translucent, then add garlic.  Meanwhile, in a large bowl, mix the meat with the cumin, paprika, cinnamon, salt and pepper and tomato paste and add to the large pan.  Cook until brown, stirring periodically.  When finished, turn the heat off and let the meat cool a little.

Preheat oven to 400 degrees.  Take sheet of the defrosted puff pastry and roll out slightly.  Cut the sheet into 9 or 12 squares (depending on if you want large or small borekas).  Close to the bottom corner of each square fill with about a spoonful of the meat mixture and fold top half to meet the bottom, creating a triangle.  Using your finger, push the edges of the dough together to close. 

Repeat with second sheet of dough

Gently brush the tops of all the triangles with the beaten egg.  Sprinkle sesame seeds on top.  Bake for about 15-20 minutes, or until dough is lightly browned. 


Tuesday, March 31, 2015

Chocolate Hazelnut "Opera" Cake for Passover

Earlier this month, we were fortunate to have famous cookbook author, Paula Shoyer for a Passover cooking demonstration.  She came out with a new cookbook, The New Passover Menu. This cookbook is unlike her other cookbooks, which focus solely on baking.  This book includes tasty soups, salads, side dishes and entrees in addition to her famous desserts.  While she was here, we made a delicious red pepper soup, a salad with mango and avocado, salmon stuffed gefilte fish, roasted eggplant, meringue fruit cups and, of course, the Opera cake.  You would never know that this delicious, rich, chocolate cake is kosher for Passover!

If you like this recipe, you can pick up Paula Shoyer's new cook book here:


Ingredients:
Ganache:
16 ounces bittersweet chocolate
1 cup almond milk or parve whipping cream
3 tablespoons strong brewed coffee or espresso
Hazelnut Cake:
6 large eggs, separated
3 tablespoons sugar
1 ½ cups confectioners’ sugar                        
1 1/3 cups ground hazelnuts                                      
2/3 cup potato starch
4 teaspoons oil                                   
Coffee Syrup:
½ cup sugar                                                    
½ cup water
2 tablespoons strong coffee or espresso

Directions:

Make the ganache first so that it firms up a bit while the cake is baking. Break the chocolate into small pieces and melt over a double boiler or in the microwave oven. Heat the almond milk or cream until hot, not boiling. Add to the chocolate mixture a little at a time and whisk well after each addition. It will get very thick but will smooth out as you add more almond milk.


Divide the ganache between two bowls, two-thirds into one bowl and one third into another. Cover the bowl with the one-third amount and place in the fridge. Into the second bowl with the two-thirds of the ganache, add the coffee and whisk well. Cover and place in the fridge for 15 to 20 minutes, or until the ganache thickens to a spreadable, not pourable consistency. If when you are ready to assemble the cake and the coffee-flavored ganache is not thick enough, place the bowl into the freeze for five to ten minutes and then whisk. If the ganache gets too hard, heat it in a microwave oven for a few seconds and whisk until smooth.

To make the cake, preheat oven to 375°F. Trim a piece of parchment paper to fit perfectly flat in the bottom of a 12 X 16-inch jelly roll pan.
Use an electric mixer to beat the egg whites on high speed until stiff. Turn the speed down to low and add the three tablespoons sugar and beat for another 30 seconds. Transfer the beaten whites to a separate bowl. Into the bowl you just used to beat the whites, place the confectioners’ sugar, ground hazelnuts, egg yolks, potato starch and oil and beat for one minute at medium speed. The mixture will be dry. Add half of the beaten egg whites and mix well at medium speed for 30 seconds to combine. Scrape down the sides of the bowl. Use a whisk to mix in the remaining whites in two parts. 
Pour into the prepared pan. Use a metal offset or silicone spatula to spread the batter as evenly as possible in the pan. Bake for 15 minutes, or until lightly browned. Set aside.
To make the coffee syrup, in a small saucepan bring the sugar, water and coffee to boil and boil for three minutes. Turn off the heat and let sit until ready to use. May be made up to five days in advance and stored covered at room temperature.
To assemble the cake, run a knife around the edges of the pan. Cover pan with a piece of parchment paper and a cooling rack and then flip the cake over onto the parchment and rack. Peel off the bottom parchment. Measure the midpoint on the long side and cut the cake in half to make two 6 X 8-inch rectangles. Place one half on a small cookie sheet lined with parchment, with the cake bottom facing up. Use a pastry brush to soak some of the coffee syrup all over the cake. 
Use a spatula to spread the chocolate ganache evenly on top of the cake all the way to the edges. Place the other cake half on top. Brush with syrup. Spread the coffee-flavored ganache on top, reserving about two tablespoons to decorate the cakes later, if desired. Heat a metal spatula under boiling water, dry and smooth the top. Place in the freezer until ready to serve. Place the extra ganache into a small bowl and place in the fridge until ready to decorate the slices.
To serve, trim off ¼ inch off all the sides of the cake to even them out. Eat the trimmings. Heat a knife with hot water to cut the cake into rectangles. Clean and reheat the knife between slices to get perfect slices. Warm the reserved ganache slightly to make it spreadable. Place into a pastry bag with any shape tip and pipe designs on top of each slice. You may add a coffee bean to the décor. If you do not have a pastry bag, heat the ganache until you can drizzle it and use a fork to drizzle over the slices to create some texture on top. Store in the fridge. 


Tuesday, February 17, 2015

"Lighten Up" Shabbat Dinner

Last Friday I had the opportunity again to participate in this year's Beth El "Lighten Up: Friday Night Invites."  It is a program that matches Beth El families with other families to create connections and friendships within our community.  It is a great program that has matched over 200 families with each other over the past few years.  (If you want to participate - either by hosting or being a guest, please contact the Beth El office.)  We had over a really nice family over that has a child around the same age as ours.  The kids played great together and the we really enjoyed meeting a nice couple to become friends with.  But this blog is about what I cooked!

I learned about this chicken dish on joyofkosher.com.  I have to tell you, when I read the recipe, I didn't think it would be anything special.  But for some reason, I still really wanted to make it. I am glad I did.  It was delicious and gorgeous.  It was also easier to make than I thought it would be.

Green Bean Stuffed Chicken
Ingredients:
6 boneless and skinless chicken breasts, tenders removed
1/2 cup Russian Dressing
1/2 cup seasoned bread crumbs or matzo meal
1/2 cup cooked green beans
Hot sauce, to taste
Salt/Pepper, to taste

Directions:
Pre-heat oven to 350 degrees.  Pound chicken cutlets to about 1/2 inch thick.  Marinate the chicken in the salad dressing with salt/pepper and hot sauce to taste for 30 minutes or up to 2 hours.  Pour bread crumbs in a shallow bowl or dish.  Press the chicken, one at a time, into the bread crumbs so that one side of the chicken is coated.  Place some green beans (or any vegetable you have on hand) on one side of the chicken and roll the chicken up and place in a deep casserole dish, seam side down.  Repeat for all chicken breasts.  Bake in oven for 30 minutes and enjoy! 

Before cooking:


After cooking:
 
 
I wish I could have taken a picture of the chicken cut in half to show you how pretty it looked. 
 
Now, you will notice that before I mentioned to remove the tenders from the chicken breast.  With the tenders, I coated them in bread crumbs (without marinating in the dressing first) and fried them up as chicken nuggets for the kids in case they wouldn't eat the above.  Well, I'm happy to report that we had the chicken nuggets for lunch the next day because there were no complaints around the table.

Tuesday, January 27, 2015

Israeli Turkey Meatballs and Chickpea Smash

Tu B'Shevat is next week!  The Jewish New Year for the trees is often celebrated with a Seder consisting of the Seven Species that are described in the Bible as being abundant in Israel.  They are wheat, barley, grapes, figs, pomegranates, olives and dates.  Normally I made a meal that has all of these ingredients included.  But this year I am going to take a different route.  I am making something that tastes like Israel. 

I was inspired to make this recipe by seeing a very similar recipe in the Smitten Kitchen Cookbook.  The turkey meatballs are moist and delicious.  The addition of the toasted sesame seeds is so simple, but a fun complex element to the flavor.  They are even toddler approved!  The chickpea smash is similar to a "lazy" humus without the tahini.  The chickpeas are not blended until smooth, but instead just smashed together with a potato masher.  I made an Israeli salad of cucumbers, tomatoes, and lemon juice as a side.  This dish is tasty and creative enough for a holiday, but also easy enough for a weeknight meal. 

Turkey Meatballs and Chickpea Smash
Ingredients for meatballs:
1 lb ground turkey
1 egg
2/3 cups matzo meal (or bread crumbs)
1/4 cup water
2 cloves garlic, diced
2 Tablespoons toasted sesame seeds
1 teaspoon cumin
1 teaspoon coriander
1 pinch cayenne pepper
Olive oil

Ingredients for chickpea smash:
2 cans (15oz) chickpeas, drained and rinsed
1 clove garlic, diced
1 Tablespoon capers
2 teaspoons sumac
Juice of 1/2 lemon
Olive oil
Handful of parsley, chopped

Directions:
Preheat oven to 400 degrees.  Mix all ingredients for meatballs in a bowl.  Add enough oil to coat a large frying pan.  With wet hands, make golf-ball size meat balls and brown in frying pan.  Transfer to baking dish.  Finish cooking meatballs in the oven, about 10 - 15 minutes.
Meanwhile, in a separate bowl, combine the ingredients for the chickpea smash, except the parsley.  With a potato smasher or a large fork, smash together, leaving it textured.  Mix in chopped parsley.  Depending on your desired presentation, you can sprinkle some more sumac on top.